Google Calendar Integration on RnB Plugin
Step 1: Go To Google Developers Console
To use this integration, go to the Google Developers Console.
Step 2: Create Project On Google Calendar
Go to: Projects > Create Project button. A popup should appear and ask for Project Name
and Project ID. Enter your preferences.
For example

Step 3: Enable the Calendar API
Once the project has been created, you are in the project folder. Go to the Library link on the left-hand menu. Choose the Calendar API.

Then click on Enable
Step 4: Create Calendar Credentials
This will prompt you to first create credentials. Select Go to Credentials.

Choose
- Web Browser (JavaScript) as the source
- Select User data as the data type

Alternatively, go directly to the
API Manager > Project > Credentials page.
There, select Create credentials.

Step 5: Insert new Credentials
- Give your Credentials a
Name - Leave the
Authorized JavaScript originsblank - Enter http://example.com/wc-api/red_rental_google_calendar/as the
Authorized Redirect URIwith example.com being the URL of your web store

Step 6: Set up your Consent screen
- Your email address is already selected
- Enter a
Product name shown to users - You can also enter extra customization options

Step 7: Download Credentials
Once this is done, download the credentials. Open the .json file to access them. In the file,
you’ll find several things, but these two are needed for the Bookings integration:
client_idclient_secret
You can also access these by going to the API -> Credentials page after having created them. There click on the name of the credentials. You can copy the client ID and secret there.

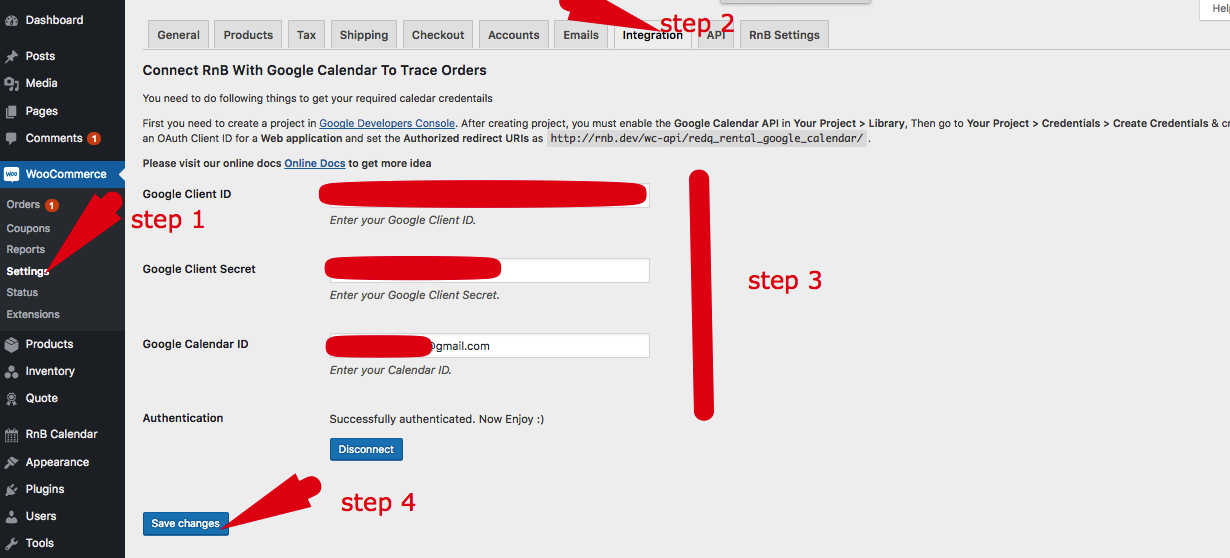
Enter these two in your store under
WooCommerce > Settings > Integration.
Step 8: Get Calendar ID
Create the calendar you will use in Google Calendar, if you haven’t already. Then navigate to My Calendars on the left, and select Calendar Settings.


On this screen, there is a section called Calendar Address. Copy the Calendar ID.

Step 9: Integrate These Credentials into WooCommerce Settings Panel In Your Site
Go to: WooCommerce > Settings > Integrations, and enter the Calendar ID.
Finally, select Save changes

Once you’ve entered your credentials and saved your settings, you will be provided with the option to authorize your account and calendar with Google.
Now check your wooCommerce order into your google calendar.
